Series D details

craig

Well Known and Active Forum User
VOC Member
Test ride today, first nice ride day in a month or more.
Cowl and windscreen worked very well.....but I think the extension would be better.....the hand muffs are wonderful....doesn't seem to be any lose of speed, however side wind will keep you leaned over more than without cowl, not much.
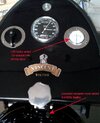
Speedo and ammeter worked wonderful. Windscreen is removable, but not a quick 60 second job.
I went to allen head bolts holding the sides of the windscreen...and I use a an extended, ball end allen socket to fasten into the nut plates.
I do not have peel/stick noise liner yet, but did not notice much/any noise or drumming.
50 mile run, some at 65mph, most at 45 mph. oil temp reached 117F, head temp 305F.
I keep checking for loose acorn nuts, none yet.
cant reset speedo trip yet.
Cheers
Craig

IMG_8163Mar8small.JPG
 

craig

Well Known and Active Forum User
VOC Member
Temperatures at (1) spark plug base and at (2) A22 banjo feeding into bottom of UFM from Cylinder return pipe A54AS. These are both showing max temp achieved during ride.
Oil temp is a slow rise .....and rising the whole run. Spark plug temp changes quite quickly depending on horsepower requirements.
Still waiting for Lucas switch, LEDs for ammeter lighting, cell phone charge port.
K&N conical air filter fell off at stop light I did not notice, some very nice girl jumped out of her car, retrieved it and handed it to me.
Good thing to have a full-face helmet and hide your embarrassment.
good weather today, more testing
Cheers
Craig
8166Temperatures.JPG
 

craig

Well Known and Active Forum User
VOC Member
Bought a 12" x 14" piece of acrylic clear .093" thick at Lowes $ 4.
Bought an acrylic scoring tool $4 Lowes.
Cut an aluminum pattern for the top/bottom acrylic curve out of .060 alum scrap.
clamped to work bench, scored the curve, piece cracked apart ruined when I tried to flex/crack it.
Found out when you score a curve, you have to score thru the piece 100%, all the way thru, for the piece to be successful.
Ended up with a nice piece and a scrap that looked like it was usable as well. Decided to use scrap piece to learn how to heat bend , drill holes, mount, and test ride.
Here it is .....scrap piece bent with heat gun....drilled, mounted...........took it for a ride.
Set the heat gun on the workbench, held the plastic piece you are looking at (with protective plastic still on both sides) up to the gun maybe 4" away, moved it around to evenly heat.
As it heated, I simply bent the plastic by hand, be careful with fingers holding plastic near heat gun! Do it once with scrap , you will see how to do, no need to remove protective plastic until bent and drilled.
20140310_PR374small.jpg
 

craig

Well Known and Active Forum User
VOC Member
Comet out for 100 mile run Feb 10 with new PR374 windscreen extension (using scrap acrylic). Wind noise in helmet eliminated. Helmet visor keeps fogging up due to low flow. PR374 extension is a little distracting when riding....seems to be flitting across my view ....maybe I will get used to it and tune it out. Three pieces of plastic to view thru - helmet visor, drop down helmet sun screen, and PR374....good when all are fresh and clean.
The windscreen plastic seems static electricity charged and accumulates dust at a fast pace....maybe it is just the dust from post winter salty, gravely, sandy roads. It seems the windscreen will be replaced every winter season.
The hand muffs, cowl and windscreen allow a more comfortable ride in winter temps..........a very nice addition...still working out details. Only my knees and thighs are getting cold, I do have winter riding zip over pants, but have not used them as I wanted to see how much coverage the cowl would provide.
Comet very nice at 60mph, did get to 70+ mph with everything fine. Comet seems happiest at 50-60 ....with or without windscreen.
20140310_100Miles.jpg
 

craig

Well Known and Active Forum User
VOC Member
Actually yesterday was March 10, too bad no edit to correct all my mistakes..............so 100 miles on March 10.
Currently reworking speedo to allow odometer reset. New ebay chrome Smiths speedo flange not working out too well...does not thread on precisely.
 

craig

Well Known and Active Forum User
VOC Member
Added LEDs to illuminate ammeter.....cut a 2" circle of clear acrylic (which I had laying around) with hole saw, drilled two holes to use existing "hot" studs on ammeter back to hold in place, slotted the side of new acrylic plate at bottom in two places just wide enough to squeeze the LED , used RTV to hold LED in place. no photo.
The LED are much smaller than they look ...3mm in diameter.
Added an extended reset shaft to S.433/3/L and it works great. I used foam rubber, between S1 and handlebars, to provide a mount and vibration proof.
20140311_LEDsAddR.jpg
20140312DdashLEDs.jpg
 

Attachments

  • 20140311_LEDsAddR.jpg
    20140311_LEDsAddR.jpg
    70.8 KB · Views: 4

craig

Well Known and Active Forum User
VOC Member
Okay, The Lucas switch came in from England. The new Lucas, off/on, hex mount switch is designed for sheet metal mounting, but is easily converted to 3/16 fiberglass by trimming the six webs back with a Dremel tool. The battery lead to the ammeter was rerouted to this new switch, then switch to ammeter.........so the switch simply turns the battery off/on. Lucas logo key.
The dashboard is now cosmetically complete. I have a cell charger coming Ebay, but this charger/clock will be mounted in SL5L or SL1. Test ride today........kick starting requires you think about your helmeted head and whether you will be knocking the windscreen. Cool temps today really benefited rider with cowl/windscreen.
Having issues with FT284 steering damper spring, seems to need bigger screws to hold in place.
Cheers
Craig
PS - I lost a nut holding wires on the headlight switch during ride today, tail light wire came off, nut lost. Now I put penetrating Loctite on several screws/nuts.
20140314_LucasKey.jpg
 

b'knighted

Well Known and Active Forum User
VOC Member
The D damper spring is of lower quality than the B/C design. To use the previous design refer back to posting 14.
 

craig

Well Known and Active Forum User
VOC Member
I have mounted the FT284 spring with two BA10 to start with, bottom screw was too weak. Then upsized lower one shown with a 3mm cheese head, now the upper BA10 has torn out. Seems I need a bottoming tap to actually fit these holes. I am probably just whining about not having a local resource for small bottoming taps. I will look back at #14, Thank you
20140314_FT284Spring.jpg
 

craig

Well Known and Active Forum User
VOC Member
The D damper knob has a leaf spring which engages on the flats of the hollow bolt to serve as the damper detent. A worthwhile improvement is to replace FF81 with a much larger headed bolt so that a sprung ball can be fitted to use the C knob.
Thank you , I understand, great idea..............This will require me to find and fab more than I was planning. I am out to find small bottoming taps............or Ebay
Cheers
Craig
 
Top