Perfect advice and will certainly check out. I replaced the washer you show and will check it too along with getting an o ring. My washers come from Coventry Spares and more than likely they are precise, Coventry here in the US has been supplying for a long time and owner John Healy is a past master at fuel delivery, problems, etc. Thanks again for keeping up with my hiccups.Carl, the knackered washer is only part of your problem, but you do replace it anyway. You don´t have to align the two holes in the hollow bolt as it is waisted around the holes. The small hole and short bolt are just for plugging the drilling that goes into the float chamber so no other purpose and not your problem. At same time go through that drilling into the chamber for cleaning it safely. I was thinking about a check of both float chambers after you have got several seconds of a running engine: As soon as the engine has died like it does for weeks , close the fuel tap and feel for the ticklers. When fuel level is still as required you should feel the ticklers hitting the floats inside, both ticklers checked like this. So you know fuel has filled the chamber correctly. If this is not so, the chamber with low level does not get fuel , so something to investigate.
The fibre washer Greg mentioned is the large type pressing on the jet block onto the body. In case the i.d. of that washer is too small it will block the drilling for the pilot jet and starting the beast will be a pain.
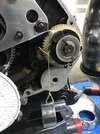
These fibre washers will not seal this place easily when faces may not be extremely smooth. So I´d go for a small cross section o-ring a tad thicker than the fibre washer which will then be just a spacer, no seal. See photo, the washer o.d. reduced for the o-ring around it.
Vic
View attachment 59890
You are using an out of date browser. It may not display this or other websites correctly.
You should upgrade or use an alternative browser.
You should upgrade or use an alternative browser.
ET: Engine (Twin) Still Can't Start My Twin, Replaced Mag, But Not A Pop
- Thread starter CarlHungness
- Start date
Yes the picture Vic posted is the washer I was talking about........In Vic's picture I see the washer looks like a hard red fiber type........this is not the same as the new ones supplied in the Amal gasket kits........these are a more soft gasket type material that tend to seal up fine just as the are, although a smear of grease on the threads helps the nut do up nicely.......Again if that washer is wrong and the ID is too small, it will block off the pilot feed supply.......this will cause the engine to start and run briefly, then struggle and quit as the fuel supply cannot reach the pilot circuit. If this washer seems ok, then the next obvious choice would be that the float level is too low.........A simple tool made from a spare carb banjo bolt the end drilled and taped to suit a small brass nipple, a length of small diameter clear tube is pressed over this nipple and then the float level can be checked like a water level........level with or just bellow the base of the mixture adjusting screw........the bike upright and level itself to carry out these checks.........All good fun.......Cheers........G.
The washer that was stuck in the float arm wasn't the problem...just tried starting it and couldn't get a pop.Yes the picture Vic posted is the washer I was talking about........In Vic's picture I see the washer looks like a hard red fiber type........this is not the same as the new ones supplied in the Amal gasket kits........these are a more soft gasket type material that tend to seal up fine just as the are, although a smear of grease on the threads helps the nut do up nicely.......Again if that washer is wrong and the ID is too small, it will block off the pilot feed supply.......this will cause the engine to start and run briefly, then struggle and quit as the fuel supply cannot reach the pilot circuit. If this washer seems ok, then the next obvious choice would be that the float level is too low.........A simple tool made from a spare carb banjo bolt the end drilled and taped to suit a small brass nipple, a length of small diameter clear tube is pressed over this nipple and then the float level can be checked like a water level........level with or just bellow the base of the mixture adjusting screw........the bike upright and level itself to carry out these checks.........All good fun.......Cheers........G.
Fuel is flowing freely from the taps, bottom of the carb sure seems like it is getting fuel as it is wet and when I
remove bottom bolt I'm getting fuel. Since the float bowl has only a needle with a clip don't know how I could
change the float height in case it is wrong. I removed the float bowl and didn't get any fuel out of it, and I thought
it should have some, as I tickled both bowls before trying to start it. The washers I received from Coventry seem to
be the same size as the old ones. Don't have any extra carb parts so may have to obtain in order to make a float level checker. This is the most maddening circumstance I've encountered in 30 odd years of ownership. My shop is 15 minutes from my computer so came home to check latest comments. How would one change float level, and of course wondering just how it changed itself from the 20 years prior when it all worked well. Just could not tell from
the brand new plugs if they were wet or not, but it doesn't seem like it's getting any fuel or I'd at least be able to smell them...but again not totally sure. As noted, when it has fired rear plug awfully sooty..but hasn't fired in a while.
havent read it earlier so suggesting anyway:
just to eliminate (or support) the fuel starvation, have you sprayed a bit of brake clean or Wynn's Start you bastard in the carbs and die a starting ritual?
should it fire right up then indeed its a fuel thing.
goes without saying: the manifolds are tight against the head and no air leaks, nor between the manifolds and carbs?
I know the spark is good, had mag rebuilt last week, and it started with that mag, and also
started with the B-TH. Have to get a fire extinguisher and wool blanket before this old man
will spray anything into the carbs. If manifolds were leaking it would not have sounded
ultra crisp the last three times it started...for 15 to 60 seconds. Problem defies logic, now
it won't fire at all.
started with the B-TH. Have to get a fire extinguisher and wool blanket before this old man
will spray anything into the carbs. If manifolds were leaking it would not have sounded
ultra crisp the last three times it started...for 15 to 60 seconds. Problem defies logic, now
it won't fire at all.
Received my new ATD today and as I was unpacking it a tiny brass washer fell out on the bench, an
ominous sign. I looked it over and discovered the ears separate 1/4" whereby the originals had
5/16' between them, so wondered if timing would be affected.
Not sure precisely how to proceed I put a very small amount of valve grinding paste (that I had rubbed
into a steel plate in an effort to make it less abrasive) on the nose of the mag, put the ATD on and spun it
to and fro a few times. I checked it with Dykem bluing and it seemed to be touching all the way 'round.
Per usual I got the rear piston on TDC, backed it down a bit, installed my piston stop, went through my
drill on the mag with my light on-off, on-off, etc. to try and make sure I was at precisely 35 degrees. I put
my bolt in the earth brush hole, finger tightened and offered the ATD up to the mag. I was able to start the
bolt with the horseshoe washer in place, pulling back on the ATD as I went, and according to the Lucas
workshop manual I tightened the bolt with my fingers and was positive the plot was moving home. I then
tightened it with a socket whilst holding the center bolt in the mag with another socket, and the ATD went
full home, or so I think.
I went through my starting drill, which now is different than what I've done in the past. Open taps, let sit
for 3-4 minutes, tickle both, pull in de-comp kick through 3 times, then kick through once levering the de-comp
so I believe I am actually sucking fuel into the carbs. Let sit 15-20 second hoping fuel will atomize. It is now easy
enough for me to find a long stroke, which sure seems to be followed by rear carb sucking, then short stroke..and
j-u-s-t ease over short...bring lever back, and again, it seems as though I am getting a nice, full swing in to spin
the engine.
Nothing. No pop. Nada
Did it all again multiple times. Maybe it's flooded. Open twist grip, kick through 3 times, start over. Nothing.
Somewhere in the action I decide to open the throttle and kick it...and for the first time in my ownership, it kicks back! Ka-Chunk. I opened the throttle and it kicked back again, no pop.
Took out plugs, rear valve caps off, look at the valves, exhaust is opening, then closing. Watch until I see Intake opening, then closing, go round and piston at the bottom. Put finger in hole, can feel a bit of a poof, am
as sure as I can be I'm on compression. Bring it up to TDC, back it up, put piston stop in, get piston to hit stop,
look at mag, and the 'shoe' on the ring is right where it has been for over 30 years when my timing is right..it
is just approaching the bump.
Am sure as my meager abilities allow I have it timed right. How did I get kick-back? As noted earlier
my previous starting method all these years has been positively wrong...if it didn't start in 2-3 kicks, which it
never did, I'd open the throttle, kick and release decomp, and it'd start in 2-3 more kicks. This time I am literally
not opening the throttle..maybe a millimeter or two.
I'm now to the point of questioning my own abilities. To install the ATD I removed the timing chest to
once again make sure it went on perfectly, ears blocked open with 1/4' bolt, etc.
I'm about as knackered as a man can get trying to get this machine to run. Pal Glen Bewley says he can
take a look at it in late summer, so for once the Beast has beaten me. I am SO out of options I am just going to
cover it up. The Lucas is rebuilt, $400, the ATD is new $350, new jets, etc., etc. Maybe I'm not supposed to ride
this year.
Attachments
hope not to kick against any sore shins, try the ignition form another approach (perhaps even simpler?):
- set the nr 1 cylinder at TDC as per usual
- retard the crank only 8 degrees (ccw).
- set the mag with the points at the correct lobe, just at the cracking point (light on/off).
- mount the ATD on the mag without disturbing the mag. DO NOT advance the ATD fully, leave it at rest or fully home in the most retarded position.
at least now you know that the static ignition is at 8 degrees BTDC, and not even retarded few degrees ATDC.
I did this to my rapide after fidgeting at 38degrees BTDC and ATD full advance etc., and it works pretty well! the old ATD will have indents to where the advancing arms hammer into the other arms. this affects both variable timing range and starting point.
why: the Enfield has identical bore and stroke and even similar compression ratio and valve sizes, so a very good comparison. there it is set at 8 degrees BTDC, works a treat.
going into detail (its pretty much geometry):
measure the diameter across the ATD where the advancer has indented its max stops. divide by 2 to get a radius figure.
then measure the gap between the advancer and the stops (this is the range in which the ATD can vary its timing).
you have 2 radii and a gap, and the triangle it forms has a small included angle. calculate that angle (here comes the geometry into play) (will be in the range of 10-15 degrees).
multiply that angle by 2 will give you the timing range of that ATD. let call that angle beta.
therefore: setting max advance at 35degrees BTDC will give you a (35 - beta)degrees static at low idle. for example, beta = 26degrees. the static will be 35-26 = 9degrees (the larger the static advance the higher the chance of getting kick-back).
setting the ignition form static approach: 8 degrees BTDC + beta = 8 + 26 = 34 degrees.
should you have a new ATD without indented arms the range is less than a worn example. therefore, if timing set at max advance, the static can be more and give you a potential kick-back.
anyway, just an idea.
my ATD is worn a bit and set at 8degrees BTDC static, giving a max advance of 38degrees.
what I do do is tie a thread from the ATD to a heavier object so all the slack in the drivetrain is removed when setting the timing.
note: picture inserted is showing my ATD at max advance and slack out of the drivetrain, when setting at 38degrees BTDC.
Attachments
Last edited:
Yes, need to measure the ATD range, if the new one only has say 10 degrees (20 at the crank) then setting at 36 gives 16 for starting - as detailed in previous post. You can either measure with geometry or place it on a compass rose and do it visually.
I think what you are saying is not to use my spark plug stop that sets the plot at 35 degrees, rather gohope not to kick against any sore shins, try the ignition form another approach (perhaps even simpler?):
- set the nr 1 cylinder at TDC as per usual
- retard the crank only 8 degrees (ccw).
- set the mag with the points at the correct lobe, just at the cracking point (light on/off).
- mount the ATD on the mag without disturbing the mag. DO NOT advance the ATD fully, leave it at rest or fully home in the most retarded position.
at least now you know that the static ignition is at 8 degrees BTDC, and not even retarded few degrees ATDC.
I did this to my rapide after fidgeting at 38degrees BTDC and ATD full advance etc., and it works pretty well! the old ATD will have indents to where the advancing arms hammer into the other arms. this affects both variable timing range and starting point.
why: the Enfield has identical bore and stroke and even similar compression ratio and valve sizes, so a very good comparison. there it is set at 8 degrees BTDC, works a treat.
going into detail (its pretty much geometry):
measure the diameter across the ATD where the advancer has indented its max stops. divide by 2 to get a radius figure.
then measure the gap between the advancer and the stops (this is the range in which the ATD can vary its timing).
you have 2 radii and a gap, and the triangle it forms has a small included angle. calculate that angle (here comes the geometry into play) (will be in the range of 10-15 degrees).
multiply that angle by 2 will give you the timing range of that ATD. let call that angle beta.
therefore: setting max advance at 35degrees BTDC will give you a (35 - beta)degrees static at low idle. for example, beta = 26degrees. the static will be 35-26 = 9degrees (the larger the static advance the higher the chance of getting kick-back).
setting the ignition form static approach: 8 degrees BTDC + beta = 8 + 26 = 34 degrees.
should you have a new ATD without indented arms the range is less than a worn example. therefore, if timing set at max advance, the static can be more and give you a potential kick-back.
anyway, just an idea.
my ATD is worn a bit and set at 8degrees BTDC static, giving a max advance of 38degrees.
what I do do is tie a thread from the ATD to a heavier object so all the slack in the drivetrain is removed when setting the timing.
note: picture inserted is showing my ATD at max advance and slack out of the drivetrain, when setting at 38degrees BTDC.
through my drill of TDC, then back it up only 8 degrees with ATD closed. Your photo shows the ATD fully
open, (ears held by a Ty-Wrap and weight on the ATD to take out the slack, correct?) It had been suggested
I follow what you've said, only to use 4 degrees BTDC, not 8. The writer noted I may get some pinking out
of the engine with such a setting. Then too I understand it is not unheard of for the cam pinion to slip on the
cam proper and at the moment I don't have the knowledge to check if that's what happened. We know for
fact the new ATD has 1/4" separation between the ears, and the original was 5/16". I have never re-checked
timing in past years when I installed the ATD (or the B-TH). I have always put the ATD on, ears blocked open
set at 39 degrees, light flickering, never used a bolt in the earth brush hole previously to hold the armature, now
I do and it's bitch to finger tighten it and keep the light OFF..light wants to go ON every time I finger tighten.
This time after setting the new ATD and no result, I re-installed the piston stop after getting to TDC, backed
it up to allow room for the stop, put it in, put piston against it, looked at the magneto and the SHOE sure
seemed to be in the original place I set it for my now 35 degree mark. The 'mark' is just damn close to the
old 39 degree mark, my old pencil mark still there. Thus it seems as though the shoe is at the 35 degree mark
where I set it originally with the ATD ears blocked open. Shouldn't the shoe be many degrees away from that mark
(in a clockwise direction) if in fact the ATD advances the mag?
I checked the timing to see: Did the ATD slip on the mag shaft, am I certain I set it at 35 degrees. The ATD
did not slip far as I can tell, it went on perfectly, using ONLY the bolt, NO socket to set it as I had done in
past years. So I'm asking just why in the Hell the bike started last week, ran great for 60 seconds and quit.
I got an ultrasonic cleaner today, took off carbs, cleaned them, and once again, no result. No pop, no kick back.
I'm getting spark, took out rear plug, held it on the Britax bar, kicked it and can see spark.
Have had the pipes off 7-8 times, drain oil, take off timing chest, and on and on...will do it all again, but have to
get some knowledge on how to actually check the cam timing to see if something has slipped on a shaft.
Really appreciate the suggestions. I am supposed to be practicing my oxy welding aluminum and haven't
fired the torch in a couple of weeks.
Carl, What you are seeing with the reduced travel on the ATD is the new ones have less overall range due to modern fuels not needing so much advance in these old engines.........It looks like you have got everything pretty much covered from what I've seen.......A couple of tricks I've learnt from working on these bikes when they are hard to start.........If after you have kicked the engine several times say 10 times or so........Stop and pull the plugs out........If the electrodes look dry, then you do not have enough fuel in there.......if they are wet, well obviously too much fuel. The plug check seems to be the only quick way I've found to really give you an idea as to what is wrong. If the plugs are wet, I generally blow them off with compressed air........reinstall them, then the engine should fire up within a couple of kicks at most.........The throttle opening amount is important.......generally these bikes like to start with minimal throttle opening, but if the mixture is quite rich then a half open throttle is what is needed........Kicking back on the K/s lever indicates the mixture is lean if all else is correct........Good luck with it........Cheers.......Greg.