You are using an out of date browser. It may not display this or other websites correctly.
You should upgrade or use an alternative browser.
You should upgrade or use an alternative browser.
Misc: Everything Else Standard Comet Special
- Thread starter Oldhaven
- Start date
I finished up fitting the Newby clutch and belt on the Comet, and thought I would document it for reference.
The verdict is that it fits in the Comet chaincase, but just barely, and it requires quite a bit of adjustment. it is a matter of 1/8ths of an inch or less. I got what Bob recommended for ratio for a Comet:
"Most Comets we have done use a 36t x 68t, 1.88:1 ratio. The 30mm wide belt we normally use gives 208mm ctr's with these pulley sizes. The smallest we can make the 36t engine pulley is 95mm dia across the guide flanges."
With this setup the belt runs very close to the outer periphery and metal of the outer primary case and interferes in some areas, requiring some removal of casting material. As a matter of fact, even the clutch pulley itself hits the outer cover in the area above the clutch. This is with the '71 Norton Commando gearbox I used, butted up against the boss on the Comet inner cover with no adjustment of lateral position by removing material on the cover or gearbox. I also have the clutch pulley as far in on the transmission shaft as possible and use the spline runout for position. This gets the clutch pulley in the closest location to the inner cover as possible, and with my setup it is just about right. I did have to lower the circular ring on the inner chaincase around the transmission hole just a bit to keep the clutch back from rubbing. I am not sure if Bob offers different ratios with smaller pulleys, but this recommended ratio will work.
I found that the front engine pulley hit the outer cover with the .470 thick pulley spacer Bob sent. I faced this off to .320, which gives plenty of clearance on the back side and also gives the bonus of moving the belt to the inner edge of the clutch pulley for more clearance on the outer cover. As it turns out this thickness is just about the same as the E216 mainshaft spacer available for the Comet, and that has the benefit of being hardened, so you could use two of those. The outer flange on the engine pulley could have been removed, but with this thickness of spacer it appears to be unnecessary, and the flanges keep the belt in line where you want it.
By the way, I built in a belt adjuster, though I know some use the simpler method of fixed distance. With the flanges on the engine pulley the only way to install or remove a belt with a fixed distance is to remove both pulleys at once. With my setup at least, (TP crankshaft) the engine pulley is very tight on the mainshaft and requires use of the convenient threaded holes for pushing it off. This would be hard to do and means that every removal of belt or clutch will require that the engine pulley be removed. I built in enough adjustment to remove the belt without doing this. I installed a mainshaft oil seal, and the bolts used to push off the engine pulley would have marked up or damaged the seal housing. I slipped in two thin pieces of brass behind the pulley to prevent this, but that is pretty awkward to do.
I proceeded to do metal removal with my Gorton P1-2 industrial engraving pantograph. I was going to use the mill, but the pantograph uses a small cutter and it allows a bit of manual finess, since we are talking about areas where too much removal could break through the cover. Then it was up to the dremel and a burr to smooth and relieve the vertical edges and cuts. I still have some work to do with a small sanding disk to smooth things up, but I got the interferences taken care of and still left at least an 1/8" of metal everywhere. It took a bit of difficult measuring to ensure I did not get too deep anywhere. (I still have a bit of work to do on the inner cover just above the clutch pulley where things get a bit close)
One area I had not anticipated was the casting material around the chaincase drain plug. I was congratulating myself on the success I had with shroud and interfering material removal around the clutch pulley when I looked through the inspection port and "Oh S---", the belt is hitting the drain plug boss. Not wanting to use that area for a belt tensioner it was off with the cover and detemine what needs to be done. My comments yesterday that I would have moved the rear gearbox mount down from the center of the rear casting hole in the outer cover were wrong, since if I had done that this interference would have been worse and maybe not solvable. This area was particularly difficult since the drain plug hole on the outside has a slightly recessed ring around it and I was going to need to get very close to this on the inside. Again cuts with the pantograph and smoothing of the surfaces away from the ege of the belt run worked out fine, and the closest point of the belt to metal is 1/8" and only on the very outer edge of the belt, as the aluminum slopes away everywhere else. By the way, a thick Cometic gasket is a real boon for this installation, and even two of them stacked up might be a good idea or making a thin metal spacer is also a way to do it if you have the skill to cut one out.
So there it is and I am not sure how keen anyone else would be on using the stock primary covers after reading this, but I like the way it looks now, nothing valuable was totally destroyed, and my nerves are OK.
Last edited:
Ron,
Excellent summary!
I am surprised about your belt removal problems. With mine I slip the belt on the engine pulley and it slides on the clutch with minor effort. The tension is correct when done.
I don't know how small the front sprockets get, but I think they go down to at least 32T. I use the 36T as did Carleton, on the racer.
David
Bruce,
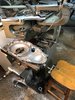
I ran a one man industrial engraving shop (Old Haven Engraving) for almost 20 years using this equipment. I like the pantograph since it is almost CNC like in its ability to profile or mill things if you make a good template. Making the template at 3-4 times the finished size minimizes any small errors in the template. Sort of outdated now but I find it useful. I still have 2D and 3D pantographs from that time and use them a lot. Back in the day (The 80's) I used to make Vincent themed belt buckles and sold a few of them through MPH. Below is the setup I used for the Comet cover. No template used in this case, just running the hand stylus (my right hand) against a straight edge while controlling depth of the 3/16 cutter at the spindle with my left hand. I finished by doing freehand contouring. This takes some practice and brain training since your hands are moving in opposite directions. I plan to use the pantograph to make a DD Vincent logo clutch hole cover for my primary, indicating the frame maker.
David,
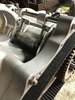
I just didn't like how much I had to stress the clutch pulley and transmission shaft when I tried to get the belt on without adjustment, but since I have it anyway it is not a problem. Bruce, here is a picture of the other end of those adjustment eyebolts.
Ron
I ran a one man industrial engraving shop (Old Haven Engraving) for almost 20 years using this equipment. I like the pantograph since it is almost CNC like in its ability to profile or mill things if you make a good template. Making the template at 3-4 times the finished size minimizes any small errors in the template. Sort of outdated now but I find it useful. I still have 2D and 3D pantographs from that time and use them a lot. Back in the day (The 80's) I used to make Vincent themed belt buckles and sold a few of them through MPH. Below is the setup I used for the Comet cover. No template used in this case, just running the hand stylus (my right hand) against a straight edge while controlling depth of the 3/16 cutter at the spindle with my left hand. I finished by doing freehand contouring. This takes some practice and brain training since your hands are moving in opposite directions. I plan to use the pantograph to make a DD Vincent logo clutch hole cover for my primary, indicating the frame maker.
David,
I just didn't like how much I had to stress the clutch pulley and transmission shaft when I tried to get the belt on without adjustment, but since I have it anyway it is not a problem. Bruce, here is a picture of the other end of those adjustment eyebolts.
Ron
Attachments
Last edited:
I too have no problem with changing the belt its a simple mater of maneuvering it off the clutch drum (spark plug out and slipping it back on, the engine pulley stays put belt should be able to twist 90 degrees mid way between pulleys I use fixed distances on all bikes only the Comet has seen slackness after two seasons racing and I simply buy another belt as for relieving the inner and outer cases I dumped them on the mill and used an end cutter by eye.
Here are the three versions of belt primary cases on my singles. The black one is an Egli Comet it has an air scoop on the front and is on a 8mm alloy plate with a 1" wall to a machined internal Primary cover. The grey one is my grey flash that is entirely std inner and outer castings machined inside, The third is a vestigial one on the racing comet standard inner machined inside and a 1" wall and simple plate cover


Here are the three versions of belt primary cases on my singles. The black one is an Egli Comet it has an air scoop on the front and is on a 8mm alloy plate with a 1" wall to a machined internal Primary cover. The grey one is my grey flash that is entirely std inner and outer castings machined inside, The third is a vestigial one on the racing comet standard inner machined inside and a 1" wall and simple plate cover
It seems there are lots of ways to do this. I'm new at Comets so this is great to see. By the way, I like the location of the sidestand on the Vibrac Egli. Plenty of support right there between those two through bolts.
For some reason I had a lot of trouble getting the belt on or off when tensioned correctly. I could not quite do a 90 degree twist but was getting the 25mm up and down slack Bob Newby recommends. I may be getting things too tight. Are the pulleys 36 x 68? There is not a lot of belt run between my pulleys to get 90 degrees without a lot of slack.
For some reason I had a lot of trouble getting the belt on or off when tensioned correctly. I could not quite do a 90 degree twist but was getting the 25mm up and down slack Bob Newby recommends. I may be getting things too tight. Are the pulleys 36 x 68? There is not a lot of belt run between my pulleys to get 90 degrees without a lot of slack.
The 90 degree twist method is a bit of a myth really, it may work on a set up where the pulley's are quite a distance apart. I believe a belt should be no tighter than if it were a chain, not tight and not too loose either. Most failures of belts seem to be from poor alignment, especially on separate engine/gearbox combinations where if the gearbox and engine shafts are not square to one another, the belt walks up one end and tries to ride over the pulley guide. If the Newby clutch is run dry as usual, the steel plates can tend to want to rust, so it it worth keeping an eye on it all. They are great value for money, I wouldn't hesitate to buy another from Bob.
Ron,
That was my primary concern about the belt. I have exactly the same set up, 36 and 68 in the same distance. My worry was that if your belt did not slip on and off a little easier it was too tight. I never did the 90 degree twist, just up and down an inch. The belt, unlike a chain, does not need to be tight, it just should not run very loose. I think that inch or so of movement should do it, but I never measured it either.
In general when I was replacing the belt, if it would not go on easily it was too tight. If it went on too easily it was too loose.
David