Where to put the ends of the clamp to be secure and not remove the paint would be my worry, but if you can make it work, it must be possible. Thanks for the tip. I'll see how I get on fettling some bits of aluminium angle and threaded rod first. I've got some in the shed already, so no investment needed!I have always managed with a pair of 3ft sash clamps.
You are using an out of date browser. It may not display this or other websites correctly.
You should upgrade or use an alternative browser.
You should upgrade or use an alternative browser.
FF: Forks Spring Box Tool
- Thread starter powella
- Start date
I tried this when I borrowed Vibrac's blue rope. Unfortunately, I'm unlikely to have 58 years left to perfect the method.......I use the same tool as Tim, but not quite so sophisticated, instead of a stick, I tension the tool to exactly the correct tension to align the top bolt by using the axle tommy bar (without the axle nut in place) to tension the tool, sometimes I add an additional tube onto the tommy bar, which affords greater mechanical advantage and accuracy, and before anyone suggests, I have been using this method for in excess of 58 years, and have not managed to wreck a fuel tank yet, but I suppose there is always a first time......
If you are overly nervous of using the rope method, you could always remove the fuel tank, just in case.....
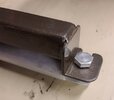
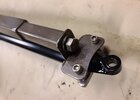
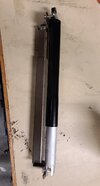
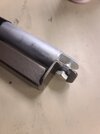
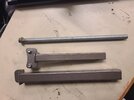
Mine is an upgrade on the one first pictured in this thread - it uses nesting square tube to keep the thread rod from buckling. I have a 3" compression which is not possible with the rope/windlass method, too sketchy around finished paint.
Attachments
The Riders Handbook describes a simple method. Using a screwdriver under the lower slot, relieve the pressure on the bottom bolt, undo it and then lever off the bottom bracket. Top bolt is now easy. Reverse the process for re-fitting. Using the right size screwdriver is key.
This avoids the risk of the top flying loose and denting the tank.
This avoids the risk of the top flying loose and denting the tank.
I'm going to chime in now and PLEASE tell me if I'm doing something wrong. I've removed my spring boxes by A) remove the screw holding in the hydraulic damper B) raise machine up in air with a floor jack and a piece of 2" x 6" cut off, or similar C) loosen lower screw on spring bolt and remove by hand. Then the top comes off as easily. So to sum up, I release the tension off the springs by raising my bike in the air. Instead of trying to tension the springs to remove and refit, just release the tension and remove the spring boxes. Why do I have that funny feeling someone is fast approaching from behind to whack me in the head ?
Two points to note on the string method
when the spring box is on the taut rope and fixed by the top bolt, (so no worry about tanks!) if the spring box is in the vertical position (ie hanging straight down) swinging it forward increases the tension by a small amount this is how I get an exact arrival point for the screw hole on the leg
Also a small chamfer on the extreme thread of the screw helps it to fit into the leg thread
Not all springs & boxes are equal - for instance on Dan's bike he had 1" slugs to increase compression and uses side car springs. Even jacking and removing the upper damper, there is no way 3" of compression can be handled by removing a screw. The tool I made has worked nicely, inspiring confidence.
By raising the bike in the air, the spring tension is released enough to grab onto the spring box and hold it/move it up or down slightly to remove the screw. It worked on mine, but like you say, not all bikes are equal, or, standard.Not all springs & boxes are equal - for instance on Dan's bike he had 1" slugs to increase compression and uses side car springs. Even jacking and removing the upper damper, there is no way 3" of compression can be handled by removing a screw. The tool I made has worked nicely, inspiring confidence.
Dont forget some PUR rings on the bottom.More is better, as far as I am concerned, so yes please to any other info you may have about this tool.
I have fitted a JE/NW steering stem with Norman's recommended springs. With a few miles on the bike and monitoring how much the springs compress in use, II think that they may be a little on the soft side. I would like to experiment with preload, adding a shortened inner spring etc. but the thought of approaching the task without a decent tool fills me with dread.
I initially fitted the new springs with the front end kit using the twisted rope method I read somewhere on here. I got there in the end, but it's not a method that I would like to use again.
As if not it can bottom out vigorously