Engrish?Doenst upload a picture from Phne.....
You are using an out of date browser. It may not display this or other websites correctly.
You should upgrade or use an alternative browser.
You should upgrade or use an alternative browser.
BNR Belt Drive
Due to several requests, I am listing the general outline of the installation of the Newby Belt Drive. The common kit supplied by Newby has an engine pulley of 36 teeth and a clutch drive of 68 teeth. This gives a ratio of 1.89. This kit, as well as being too far removed from the original ratio (1.6) dictates that the pulley is located too far from the supporting bearings. I selected from Bob, a 42 tooth engine pulley and a 70 tooth clutch drive pulley which provides a ratio of 1.67, which is closer to the original specification as previously mentioned. This allows for the reversal of the front pulley which then clears the bearing housing and brings all torque loads closer to the engine and gearbox bearings.
I am going to provide general dimensions which should be double checked on your own engine which may require small adjustments to the shimming. The specifications given have been correct for two engines. Although custom spacers can be produced, this kit was installed with off-the-shelf items.


In closing, I've written this in the absence of instructions from BNR and hope that it will be found helpful. It is really not overly complicated, but requires attention to clearances. These modifications have not been fully tested and are waiting for chassis to be built. I do not take responsibility for the success or safety of this installation. Apply these instructions are your own risk.
On a happier note, I will be developing a new system similar in design but with a sealed bearing and cush drive to be sold through Prince Performance. Not expected to market for at least one year.
Due to several requests, I am listing the general outline of the installation of the Newby Belt Drive. The common kit supplied by Newby has an engine pulley of 36 teeth and a clutch drive of 68 teeth. This gives a ratio of 1.89. This kit, as well as being too far removed from the original ratio (1.6) dictates that the pulley is located too far from the supporting bearings. I selected from Bob, a 42 tooth engine pulley and a 70 tooth clutch drive pulley which provides a ratio of 1.67, which is closer to the original specification as previously mentioned. This allows for the reversal of the front pulley which then clears the bearing housing and brings all torque loads closer to the engine and gearbox bearings.
I am going to provide general dimensions which should be double checked on your own engine which may require small adjustments to the shimming. The specifications given have been correct for two engines. Although custom spacers can be produced, this kit was installed with off-the-shelf items.
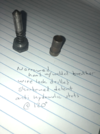
- The first step is to install a seal carrier and seal along with comet spacer E216/1 and select arbor shims to give a full thickness of .498” to .500”.
- Install front pulley flat face out. Next install a hardened .250" wide spacer available as a Harley Davidson axle wheel spacer. Reverse original ESA nut. Check clearances between pulley and engine case while tightening.
- Counterbore rear of clutch hub 0.600” deep and check for sliding fit over shaft. Clutch spline may need to be broached to achieve sliding fit.
- This is an opportune time to replace gearbox bearing E91 with a seal type bearing if desired (I removed inner seal to allow gear oil to enter the ball race. Then add shim(s) between clutch bearing and rear of clutch (mine totaled to .081”)
- Modify gear change cam plate detent retainer and shorten detent per pictures if desired
- Alternatively, you could just weld the breather hole in G37. Reduce head thickness in half to .125”
- If the weld has not encroached into the bore of G37 and the spring height remains as stock when installed then a full length detent plunger G35 can be used after grinding breather slots along the sides per previous instruction. This is done to prevent oil becoming trapped behind plunger as there is no longer a breather into the primary chain case.
- Install clutch onto spline ensuring it slides fully home. Install second hardened axle spacer (.475” thick) over shaft. Note, that spline will protrude from inside of spacer requiring counterboring the back of the C20 nut to clear the spline .020” - .030” min. Tighten and check for clearance behind clutch to engine case. Once clearance confirmed, remove front pulley and reinstall with belt. Check alignment of pulleys to each other which can be confirmed by observing belt tracking.
- Because I have retained the standard length gearbox mainshaft, modifications will have to be made to the BNR pressure plate. Cut hole in center of pressure plate.
- Make an insert to replace pressure plate center
- You may secure the tophat by heli-coiling three of the holes on the standard BNR plate and securing with three screws.
- Make a .500” spacer for the primary cover or obtain Part No. EC1623SP1500A from Cometic (which was made to my specifications). Note, you will need to hand grind the web between dynamo and clutch drive pulley
- With the spacer installed your front pulley protrude by about his amount.
- Carefully check for clearance all the way around the belt, especially where screw bosses are located.
- Now the cover will need to be modified for clearance. This can be sent to Murdoch Racing in Safety Harbor FL for an approximate cost (at the time of this entry) for $200.
The modified cover will look something like this:
- Note, the cover gets quite thin where the front pulley goes, and if you prefer, you could turn a small amount off the diameter of the front pulley outer flange. The drawing below is the machinists actual notes, and not my own.
In closing, I've written this in the absence of instructions from BNR and hope that it will be found helpful. It is really not overly complicated, but requires attention to clearances. These modifications have not been fully tested and are waiting for chassis to be built. I do not take responsibility for the success or safety of this installation. Apply these instructions are your own risk.
On a happier note, I will be developing a new system similar in design but with a sealed bearing and cush drive to be sold through Prince Performance. Not expected to market for at least one year.
Attachments


I'm guessing this is a road bike not a racer.......hence the double sided belt. As much as i love the Newby belt drive kits, the issue with using the system a lot like on a road bike.......the clutch center bearing is not a normal large sealed type.......rather than 2 large diameter machined races with about 60 to 70 tiny ball bearings in there and retained by a ring made of some black nylon, the earler ones used an alloy ring........In service this can run dry of grease and can become near seized.......This is because it is not sealed and primarily made for racing where it should be pulled apart and re greased ever year or so depending on how much use it gets.......It might seem a minor point, but worth noting if you use one for the road or track for that matter........Cheers........Greg.
Hi Brian What is the width of the belt . RogerBNR Belt Drive
Due to several requests, I am listing the general outline of the installation of the Newby Belt Drive. The common kit supplied by Newby has an engine pulley of 36 teeth and a clutch drive of 68 teeth. This gives a ratio of 1.89. This kit, as well as being too far removed from the original ratio (1.6) dictates that the pulley is located too far from the supporting bearings. I selected from Bob, a 42 tooth engine pulley and a 70 tooth clutch drive pulley which provides a ratio of 1.67, which is closer to the original specification as previously mentioned. This allows for the reversal of the front pulley which then clears the bearing housing and brings all torque loads closer to the engine and gearbox bearings.
I am going to provide general dimensions which should be double checked on your own engine which may require small adjustments to the shimming. The specifications given have been correct for two engines. Although custom spacers can be produced, this kit was installed with off-the-shelf items.
View attachment 54786
- The first step is to install a seal carrier and seal along with comet spacer E216/1 and select arbor shims to give a full thickness of .498” to .500”.
View attachment 54787
- Install front pulley flat face out. Next install a hardened .250" wide spacer available as a Harley Davidson axle wheel spacer. Reverse original ESA nut. Check clearances between pulley and engine case while tightening.
View attachment 54788
View attachment 54789
- Counterbore rear of clutch hub 0.600” deep and check for sliding fit over shaft. Clutch spline may need to be broached to achieve sliding fit.
View attachment 54790
- This is an opportune time to replace gearbox bearing E91 with a seal type bearing if desired (I removed inner seal to allow gear oil to enter the ball race. Then add shim(s) between clutch bearing and rear of clutch (mine totaled to .081”)
View attachment 54791
- Modify gear change cam plate detent retainer and shorten detent per pictures if desired
View attachment 54793
View attachment 54795
View attachment 54796
View attachment 54797
View attachment 54798
- Alternatively, you could just weld the breather hole in G37. Reduce head thickness in half to .125”
View attachment 54799
- If the weld has not encroached into the bore of G37 and the spring height remains as stock when installed then a full length detent plunger G35 can be used after grinding breather slots along the sides per previous instruction. This is done to prevent oil becoming trapped behind plunger as there is no longer a breather into the primary chain case.
View attachment 54800
- Install clutch onto spline ensuring it slides fully home. Install second hardened axle spacer (.475” thick) over shaft. Note, that spline will protrude from inside of spacer requiring counterboring the back of the C20 nut to clear the spline .020” - .030” min. Tighten and check for clearance behind clutch to engine case. Once clearance confirmed, remove front pulley and reinstall with belt. Check alignment of pulleys to each other which can be confirmed by observing belt tracking.
View attachment 54802
- Because I have retained the standard length gearbox mainshaft, modifications will have to be made to the BNR pressure plate. Cut hole in center of pressure plate.
View attachment 54803
- Make an insert to replace pressure plate center
View attachment 54804
View attachment 54806
View attachment 54807
- You may secure the tophat by heli-coiling three of the holes on the standard BNR plate and securing with three screws.
View attachment 54808
- Make a .500” spacer for the primary cover or obtain Part No. EC1623SP1500A from Cometic (which was made to my specifications). Note, you will need to hand grind the web between dynamo and clutch drive pulley
View attachment 54809
- With the spacer installed your front pulley protrude by about his amount.
View attachment 54810
View attachment 54811
- Carefully check for clearance all the way around the belt, especially where screw bosses are located.
View attachment 54812
View attachment 54813
- Now the cover will need to be modified for clearance. This can be sent to Murdoch Racing in Safety Harbor FL for an approximate cost (at the time of this entry) for $200.
The modified cover will look something like this:
View attachment 54814
- Note, the cover gets quite thin where the front pulley goes, and if you prefer, you could turn a small amount off the diameter of the front pulley outer flange. The drawing below is the machinists actual notes, and not my own.
In closing, I've written this in the absence of instructions from BNR and hope that it will be found helpful. It is really not overly complicated, but requires attention to clearances. These modifications have not been fully tested and are waiting for chassis to be built. I do not take responsibility for the success or safety of this installation. Apply these instructions are your own risk.
On a happier note, I will be developing a new system similar in design but with a sealed bearing and cush drive to be sold through Prince Performance. Not expected to market for at least one year.
I use 40mm belts which were, when I fitted it, only available from the belt drive kit suppliers, I just cut down 50mm ones which were commercially available much cheaper.
mine is 40mm too.
Last time I bought one I think I got it from Simplybearings.co.uk.
Last time I bought one I think I got it from Simplybearings.co.uk.
How do you trim them?I use 40mm belts which were, when I fitted it, only available from the belt drive kit suppliers, I just cut down 50mm ones which were commercially available much cheaper.
Hi David There is now a lot of info out there such as belt widths and pully diameters , to complete the picture what is the pitch of the belt and its form please . RogerThis is a complicated conversion because it has not been developed by a single person, so it is difficult to give an A-Z answer. Pat Manning and another owner have been working on this mod for a few years. The first attempt uses exactly the same components that you are using. They made modifications to allow the primary driveline to be moved in as far as possible.
View attachment 49711
The primary cover would need to be moved outwards by more than 1/2". This seemed to be too much as the drive could be moved in further, but not with the original parts.
The second iteration was done by purchasing a larger size engine sprocket that is closer to the stock primary ratio. This allowed the engine sprocket to be flipped around so the offset was on the inside rather than the outside. The larger sprocket allowed the bearing journal to be cleared by the extra space provided by the larger diameter sprocket and the flat side of the sprocket being moved to the outside.
The result was that everything moved further in. The end of the clutch shaft had to be shortened, but the cover fits well with a 1/2" spacer.
View attachment 49712
The HRD engine got this second iteration. If you look just above the cap and to the left, you can see the lines of the 1/2" spacer. The stock primary cover fits well and the clutch cover could be replaced by a flat plate because the clutch is well inboard. The baffle on the inside of the cover needs to be removed.
Both engines have been run and shifted while mounted to a jig, so they appear to perform well. I think a 1/2" spacer is near the limit of the extra width that a rider would want.
David