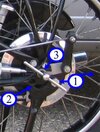
RFM lug cracked

notap

Well Known and Active Forum User
Non-VOC Member
Well I removed the wheel and isolated the lug, which promptly fell off (as I suspected it would). The break looks like its been repaired a few times by brazing and a good layer of paint. I suspect the paint had more chance of holding it together than the braze. As you can see from these images (http://jalbum.net/browse/user/album/706932/) the metal on the exposed surfaces of the break is very brittle. In fact it looks carbonised (?). Anyway, my options are clearly installing the new lug that I ordered (if there are any in stock), or the rod into the RFM tubing and then through the rear of the lug, and securing it and refitting the old lug.

The images are at http://jalbum.net/browse/user/album/706932/

Again, thankyou for your help.

Rob
 

Tug Wilson

Well Known and Active Forum User
Non-VOC Member
Hi, my RFM lug has spread presumably when starting the Comet. This bike had a sidecar attached at the time. Can it be heated and closed or is that not possible?
 

Bill Thomas

Well Known and Active Forum User
VOC Member
Hello Notap, Well spotted, I bet I wasn't the only bloke to nip out and check my R.F.M.s Good luck with the repair. Cheers Bill.
 

Diogenes

Well Known and Active Forum User
Non-VOC Member
RFM lug cracked.

As you can see from these images (http://jalbum.net/browse/user/album/706932/) the metal on the exposed surfaces of the break is very brittle. In fact it looks carbonised (?).

Rob[/QUOTE]

No, the smooth fracture surface is typical of a fatigue failure of a ductile material.
About 1920 there were still people saying that this sort of fracture surface showed the metal had "crystallized" and gone brittle. It had not - it was still ductile but had failed through repeated loading.

Can you see if the fracture surface started at the change of section where the large drilled hole in the lug ends?
A 'nice' new drill with sharp corners is ideal for producing a stress raiser.
 

clevtrev

Well Known and Active Forum User
VOC Member
Hello Notap, Well spotted, I bet I wasn't the only bloke to nip out and check my R.F.M.s Good luck with the repair. Cheers Bill.

There`s a lot more to go yet, if they haven`t already. Can`t be only two in that batch of machining.
I rode for around 3000 miles try to find out what was causing some occasionally peculiar handling. Adjusting tyre pressures, until one day I gave a demonstration to a fellow, to show him how to remove the rear wheel without tools. That`s when I found i, as I was 100 miles from home, what did I do ? rode just like the previous 3000.
 

notap

Well Known and Active Forum User
Non-VOC Member
As you can see from these images (http://jalbum.net/browse/user/album/706932/) the metal on the exposed surfaces of the break is very brittle. In fact it looks carbonised (?).

Rob

No, the smooth fracture surface is typical of a fatigue failure of a ductile material.
About 1920 there were still people saying that this sort of fracture surface showed the metal had "crystallized" and gone brittle. It had not - it was still ductile but had failed through repeated loading.

Can you see if the fracture surface started at the change of section where the large drilled hole in the lug ends?
A 'nice' new drill with sharp corners is ideal for producing a stress raiser.[/QUOTE]

Your are correct, the fracture occurred at the end of the drilling. If I get a new lug, I'll take your advice and dome the end of the lug hole with and old drill bit. Thanks
 

Diogenes

Well Known and Active Forum User
Non-VOC Member
"Can you see if the fracture surface started at the change of section where the large drilled hole in the lug ends?
A 'nice' new drill with sharp corners is ideal for producing a stress raiser."

"Your are correct, the fracture occurred at the end of the drilling. If I get a new lug, I'll take your advice and dome the end of the lug hole with and old drill bit. Thanks"

If we are really lucky, the Spares people will have realised that repeating a weakness in the original part is not a good idea, and may already have worked out that a sharp change of section is not desirable, as shown by the increasing number of failures.
The new lugs might already have a radius added at the end of the parallel part of the drilling.
We can always hope.

Merely thickening the part is a blacksmith's idea of development, though better than nothing.
 

clevtrev

Well Known and Active Forum User
VOC Member
From what I can glean, the new lugs are forgings, or at least, that is what I am led to believe. So the problem should never again occur, forgings bend, castings, snap.
Rob, you will find it easier to repair than replace. you have no idea of the heat required, both , to remove the existing part, and to replace the new.
 

peterg

Well Known and Active Forum User
Non-VOC Member
Howdy Chaps,

Wow, broken clean through, that’s a sobering sight. Only chain tension keeping those pieces abutting each other and thankfully suspension load is directed down the diagonal leg as more conventional location of the rear suspension lower anchor on the horizontal leg would have meant that whole thing would’ve collapsed.

At any rate with longtime [URL="http://www.antiquemotorcycle.org/"]AMCA[/URL] membership as a reference point where we’re enslaved to originality and preservation of components having far less pedigree than nearly anything on a Vin, think it worthwhile to point out that excessive rear stand loading – as occurs during starting – will definitely spread the adjustment slots. To get a sense for the potential damage to be wrought here, slightly slacken of the axle tommy bar and have someone swing the kicker deliberately through on body weight alone pulling off the comp. release only enough to create a pulsing effect through the chassis. You can readily feel the movement in the adjuster slot with your thumb turned sideways pressed between the flats, especially on the right side..

It’s just basic geometry/math at work here - like a logger’s duck bill cant hook, wherein the bill is the stand attachment (#1), the toe ring as fulcrum point is where the stand pad abuts the casting (#2) and the handle is your 14 inch long rear stand supporting in access of 200lbs unladen canted at 10-15 degrees rearward from its contact points on the ground. Every kick brought to bear on this arrangement is trying to pull your rear stand anchor points“down”, which if it yields, only increases the degree of inclination of the stand legs improving your load’s leverage to spread them even further. Whether the brackets break, slots spread/pinch your adjuster bolts from distortion of more concern is that most adjust their chains with the machine on the rear stand, thus the axles resting on the lower slot flats. Dropping the machine to the ground may/may not cause axle to shuffle upwards through the gap to abut the top slot flats. If one prefers starting on the stand, I’d fit a more robust Hills version.


rfmfork1.jpg
 
Last edited:
Top