Hi Robert, that is interesting thanks.If that is a GPM piston, I was told many years ago that they nip up in the 4 corners in line with the head studs. I have some NOS GPM's in a batch of parts I bought, I'll go and take a picture of one. and post it later today
You are using an out of date browser. It may not display this or other websites correctly.
You should upgrade or use an alternative browser.
You should upgrade or use an alternative browser.
E: Engine Nip up Comet
- Thread starter Tony Wilkinson
- Start date
I have just looked again at the piston, it does indeed show signs of nipping up in four places, in line with the head studs.Hi Robert, that is interesting thanks.
Thanks I will check.Tony
For safe of mind in inspect the ends of both top rings carefully. If one or both of the rings shows shows bright polished dots at the ring gap ends your rings are too tight and need gaping.
You can check this without removing the rings.
Only a few minutes to check one more possible cause.
Cheers Bernd
Basically ring gaps should be set by the manufacturer, but then, I once had a brand new Mahle auto piston taken from the original packing. When trying to slip the cylinder over it It stopped at the oil control ring and even a lot of push would not get the piston inside. So in the end I stopped trying and inspected the ring, had a nasty scratch in the cylinder bore from trying. Obviously that ring was for the next oversize when I took measures !!
In our case would a too small ring gap produce nip ups on the piston skirt like shown ?? I would not think so.
How is the fit of the cylinder liner in the crank case ? An easy slip fit with not the least resistance when shoving down ?? Otherwise I´d suspect a deformed liner from an imperfect case, less so from head studs.
Vic
Lack of piston ring gap in cast iron causes the ring to break into many small pieces, not cause piston pick up.
From the images I would first check the piston for adequate cam and taper, and if enough, put this down to the head being torqued down too tight if the liner is a snug fit into the crankcase.
Either way I would replace the piston while the engine is apart.
From the images I would first check the piston for adequate cam and taper, and if enough, put this down to the head being torqued down too tight if the liner is a snug fit into the crankcase.
Either way I would replace the piston while the engine is apart.
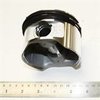
OK so here is a picture of my GPM which looks just like yours. And here is the reason you should probably chuck it in the bin.
This standard bore pair measure 1 1/2 thou bigger across the gudgeon pin faces than they do across the thrust faces, and the other pair which are 9:1 and plus .020 measure about 1 1/4 thou more again across the gudgeon pin faces that across the thrust faces.
Like I said before, I was told they nipped up at the 4 corners and that common practice was to nip them up, take the whole plot apart and file the high spots, rinse and repeat. Just like they had to do in the 20's until they figured out not to make round pistons!
Attachments


I agree with passenger0-0 100 % throw the piston away and start again. The hot spots on the piston are from thermal differences around the barrel due to the large diameter holes for the hold down studs, and as he said, the head nuts have probably been pulled down too much......max 32 Ft Lb's and no more. You need to check the depth of the liner spigot in the head verses the height of the hat section of the liner. They will most likely be either the same or the liner will show a lesser figure, this means the liner cannot seal correctly at the head joint. The head recess should be 0.125" and the liner ideally slightly more. This will give you a slight gap across the broad alloy faces of the head and barrel with head sat atop the barrel.......... You need to check this before you go any further, as any further action could become a wasted effort.
Actually I just looked over your pictures and one shows the top of the liner which has been leaking at the head joint anyway.........to be honest, I would start again with a new liner/muff assembly, new omega or CP piston, bored and honed to 0.005" clearance, lap the barrel/head joint to give the correct 2 to 3 thou air gap at the alloy broad faces, and carry on from there...........sounds expensive, not really if you want to sort it out properly and keep it reliable on the road. I don't mess around with old barrels/pistons as the grief in having to redo it over again is simply not worth it.
Anyway, continuing the thread. I have now stripped the top end. The bore looks absolutely fine and the piston will be OK with a bit of a clean up. As I thought the nip up area on the worst part just seemed to be catching the oil ring. I measured the oil hole in the liner and the top of the hole is a good 3-4mm BELOW the bottom edge of the oil ring so I am assuming this is also fine. I have yet to strip and check the cylinder head but will do that next.
Can anyone identify the piston please as I might want to change the rings?
View attachment 29723View attachment 29716View attachment 29717View attachment 29718View attachment 29719View attachment 29720View attachment 29721View attachment 29722
Its not the omega piston that most of us are running and which the club supplies. I know that at least.