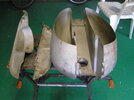
The owner has put fuel in this tank many times, but the last time fuel began leaking out the rear or the tank. I have seen this before and I found a crack near a seam and pried it of the tank. The holes you see in the photo are what I found. It had been filled with resin an body putty. Despite brazing the rear tab on both sides, no brazing or welding was attempted on the holes.
It seems that body putty or resin will last for a while under these conditions. Then, one day, there is a leak. It is difficult to explain why the holes are not repaired, but brazing is done and a nice paint job (usually). In this case it is an older restoration and I will just patch in the paint to match.
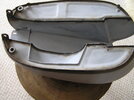
This is crash damage that if you look closely you can see that the tank tunnel is pushed to the left at the top. The rear mount had broken at both sides, but not the center. In order to remove all the braze and align it again it was easier to remove it and weld it back on. I also cut of the left front tank mount. It was not lined up with the bolt hole, much like Ron's was when he discovered that the steering head had been bent. In this case the UFM looks fine but that left front mount is noticeably bent. I thought it would be easier to cut it and bend it than to bend it in place. After a dry fit, it looks like it can be left alone and just welded back in place. I will fit the front then weld the rear mount in place.
I am not sure what the crash looked like. There is body putty in the rest of the tank, but it has been like this for a few decades. Getting rid of the leaks and stress relieving the tank is probably the best we can do right now.


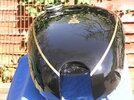
It holds pressure now, but it will have to be tested again after the mount is welded on.
David
It seems that body putty or resin will last for a while under these conditions. Then, one day, there is a leak. It is difficult to explain why the holes are not repaired, but brazing is done and a nice paint job (usually). In this case it is an older restoration and I will just patch in the paint to match.
This is crash damage that if you look closely you can see that the tank tunnel is pushed to the left at the top. The rear mount had broken at both sides, but not the center. In order to remove all the braze and align it again it was easier to remove it and weld it back on. I also cut of the left front tank mount. It was not lined up with the bolt hole, much like Ron's was when he discovered that the steering head had been bent. In this case the UFM looks fine but that left front mount is noticeably bent. I thought it would be easier to cut it and bend it than to bend it in place. After a dry fit, it looks like it can be left alone and just welded back in place. I will fit the front then weld the rear mount in place.
I am not sure what the crash looked like. There is body putty in the rest of the tank, but it has been like this for a few decades. Getting rid of the leaks and stress relieving the tank is probably the best we can do right now.
It holds pressure now, but it will have to be tested again after the mount is welded on.
David