T: Fuel Tank Advice on applying VOC petrol tank transfers please.

Dave61

Well Known and Active Forum User
Non-VOC Member
Yes, that's correct. Sorry, I thought it was common usage but I suppose it is a strange use of the word which isn't very useful if you don't know the meaning the context I use it in.

'Flatting' or 'Flatting down' is generally used to refer to the process of using abrasive paper between coats of paint or primer during the finishing process to flatten the surface before applying subsequent coats.

It is pretty much impossible to get a mirror finish straight out of the gun (or it is for me anyway) so you usually 'flat' the surface with progressively smaller grade abrasives, starting with paper, then compounds, until a mirror finish is achieved.

However, when you have to apply a water slide transfer, the logical way would be to flatten down the final coat of colour until it is perfectly flat using a grade of abrasive paper, (usually wet or dry paper) of around 400-600 grade, apply the transfer then, once dry after a few days, apply a final few coats of clear lacquer which is then flatted down again as above but finishing off with fine compounds to achieve a mirror finish.

If you do this, however, the coat that you have flatted prior to applying the transfer becomes porous I am told, and so, after applying the transfer, followed by the lacquer, the lacquer can seep under the edges of the transfer and lift it which happened to me every time. Instead of the transfer looking like it is part of the paint, it looks like a transfer with clearly defined opaque edges at best or, at worst, it protrudes through the lacquer so it can't be flatted and polished without destroying it.,

There are three solutions. The first one is to not flat the paint at all. Just apply the transfer followed by the lacquer. I don't like this as I spray outdoors and inevitably get blemishes or dust in the paint. This isn't a problem as they disappear when flatted and polished but they don't dissapear if you just cover with lacquer. If you are a great painter with a dust-free environment then you can probably use this method.

The second solution is to apply the transfer on top of the paint and then flat the rest of the item you are painting around it, leaving a gap of 2-3mm then applying lacquer. This works fine but you may have some blemishes or maybe you put the last coat ion two thick and have a very orange peel surface.

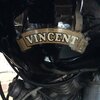
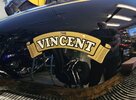
The third solution, which I prefer, is to flat the whole surface as if you weren't applying any transfers. Once I'm happy with the surface, in the case of my Vincent tank, I mask off a rectangle maybe a centimetre larger than the transfer all around, then flat and polish to bring the surface back to a shine. Word of warning, DO NOT polish this with any silicon or wax based polish. Only use cutting compounds that are silicon & wax free or you lacquer will not stick. I then remove the masking tape, apply the transfer, wait a few days for it to dry and paint as previously advised.

Here's the tank I have just finished:


View attachment 36827


View attachment 36828


View attachment 36829


The gold leaf was interesting to do and took me several goes but, like most things, once you have figured it out it is quite easy. It just frustrating figuring it out!

You`ve done a fantastic job there Clay.
 

Jim Bush

Well Known and Active Forum User
VOC Member
The gold leaf was interesting to do and took me several goes but, like most things, once you have figured it out it is quite easy. It just frustrating figuring it out!

Yes, three tries for me on the gold leaf. It came down to getting the proper sign-writers size - or adhesive. I ended up with One Shot fast gold size 4008 - It needs to go down in one even coat and allow the 30 mins to dry. I had initially used an craft acrylic size that reacted to the 2 pot paint.. I also used proper 23 ct gold leaf. Fun times, but the result is stunning.
 

danno

Well Known and Active Forum User
Non-VOC Member
I need to replace one of the transfers on my Rapide tank. Overflowing fuel at the petrol station caused the damage,
Now I don’t fill up to max anymore. A few drips evaporates away but this was a steady stream.
I have a transfer ready to go on but not sure of the best way to remove this one. It’s not lacquered over.
 

Attachments

  • B6B70123-C495-4C1E-B5F4-102C3A791BD2.jpeg
    B6B70123-C495-4C1E-B5F4-102C3A791BD2.jpeg
    362.1 KB · Views: 25

Jim Bush

Well Known and Active Forum User
VOC Member
There are a few commercial products that will remove the decals - GOO GONE, rubbing alcohol and in the US there is Permatex Decal & Adhesive remover in a can. You may need to go over the decal very lightly with some fine wire wool (not on the paint) to key the surface. Patience and care.

Any kind of paint thinner, laquer thinner, acetone, MEK will damage the paint.
 

Jim Bush

Well Known and Active Forum User
VOC Member
I can finally confirm the successful application of VOC waterslide transfers, using 2 pack Urethane Clear Coats (House of Kolor, USC01 Show Klear). The black base is HOK Urethane solid black.

The waterslide transfers were applied to polished clear coat, let dry overnight and then buried in another 3 coats of clear. Light initial coat applied allowing to dry well 30mins, then applied the final 2 coats with a dry time 20min between coats.

Clay above described the key to the application, which is applying to a non-flatened surface. I had a three failed attempts with a previous tank and had given up using the water slides and had sourced vinyl decals, which worked well. In this instance, I had the required decals in waterslide transfers and figurerd I would try one more time.

After the gold leaf lines were covered over with 2 coats of clear - I wet sanded the imperfections with 2000 grit and machine polished the areas under where the transfers go. The water slide transfers were applied in the usual way, making sure to remove excess glue around the edges, and allowed to dry overnight (actually 2 nights). The final show clear coats were applied as noted above - slowly, allowing to dry/flash well between coats. The final result is stunning.
 

Attachments

  • Vincent logo paint.jpg
    Vincent logo paint.jpg
    298.9 KB · Views: 21

CoreyL

Well Known and Active Forum User
VOC Member
I need some advice from an experienced painter on applying the card backed transfers supplied by VOC please.

I assumed these are standard waterslide transfers and I applied them the usual way by soaking and sliding into position, dabbing dry and getting air bubbles out with soft cloth. They dried overnight very nicely, nice and flat. I hit them with a couple of clear coats of House of Kolor urethane (light first coat and allowed to set up, followed by flow coat), which was fine initially - but after an hour or so they started to bubble, then after a while longer looked quite bad. After a few days, I decided I would see what's going on and found they had not stuck at all to the sanded paint underneath. A complete redo required.

I came up with two reasons against me succeeding
- I had used wax and grease remover to clean off my fingerprints from applying the gold leaf lines and I believe at this final step in the process is a no no - and should have used soap and water, or the HOK post sanding cleaner. The clear coat also was not properly adhered either and I could lift if off in small sections which leads me to believe that the W&G remover was the issue
- I applied the transfers to a sanded sealer surface - wet sanded 600-1000grit, rather than the unsanded black base coat.

I have taken the tank back to primer and will be redoing the gold leaf lines and transfers again. I have one more set of transfers and must nail it this time.

I read in the Whitakerpedia about using meths to apply the transfers- this seems drastic? That may be old advice for early decals.

I am an 25yr experienced hobby painter, with a small booth, air supplied mask and proper guns. I do about a dozen paint jobs a year typically for Norton's - mainly the dry metal flake of the 70's. I specifically use the House the Kolor products and have never had any issues like this. Thankfully this is my own tank.
I recognize my Roman Purple Metalflake Norton tank you did. It still looks great!
 

Speedtwin

Well Known and Active Forum User
VOC Member
When painting a tank I get it to more or less finish state before transfers and lines.
Best results I have had are from the following recipe.

Primed sanded, colour painted two Pak, sanded, clear coat fine,sanded 1500/2000 grit, light layer clear coat.

Apply transfers and line with one shot Gold leaf, allow to dry in air for a week.
This part is important from past experience the one shot and the transfers need to be as dry as.
I don't use heat just pop the tank in the airing cupboard.
Bonus is make you towels smell lovely.


Final clear coat three layers finish sanded in between and then machine polish.
When perfect hard clean and ceramic coat.
No need to polish ever again and ceramic coat protects the paint surface.
Looks wet, colour is so deep and no visible transfer edges.

I like to use a dark brown primer/base this again adds to depth in the paint work.
Piano black colour coat and a two pack clear coat to protect from the dreaded petrol.
The ceramic coat a friend does usually for free when he is finishing Ferrara's.
This is especially good for black finishes.
Al
 
Top